A New Plaid Skirt for Fall
About three months ago I drafted a circle skirt from instructions I found on the internet. It was to make a Dirndl inspired skirt to take with me on our trip to Germany. Alas, I did not have enough fabric, so I put the pattern aside. I recently pulled it out and decided it would be great for a fall midi length skirt. After all, this length seems to be the rage right now. I can see wearing it with Mary Janes or boots.
Here is the website I found the instructions for for the circle skirt. It is so simple as it figures out the measurements for you!
http://byhandlondon.com/pages/circle-skirt-app
I did add 4" to the hem because the original thought was to go to the knee, but as I want this to be midi length...
I then decided I might like pockets in the side seam. So, I went to a pattern I recently made and borrowed the pocket piece. As you can see, I slightly altered the piece for comfort when I slide my hand into the pocket.
I made sure to match the plaid for the pocket piece (even though no one will really see it) and placed it where it was comfortable for me to put my hand in the pocket on the side seam.
Pinned pocket piece to both sides
matching the plaid.
 |
I sewed the pocket on with the serger to finish the seam
all the way down. I used a 1/4" seam.
all the way down. I used a 1/4" seam.
 |
I pressed the pocket out to the side with the
seam toward the pocket piece.
Finally I pinned the front to the back at the side seam matching the plaid
and testing the pocket opening to make sure it was the size I needed.
I ended up only putting a pocket on the right side of the skirt since I planned to put in an invisible zipper on the left side. Follow the instructions for you machine to put in an invisible zipper. I only had a grey one on hand, but since you don't see it, it was fine. The hardest part was matching the plaid.
I used a disappearing pen to make matching marks on the zipper so that part
of the zipper would line up with the other side.
The finished zipper. Not bad, if I say so myself ;-)
Lastly, I cut a waistband piece 4" wide and a lot longer than my waist measurement. I cut the waistband in two pieces for the front and back because I did not have enough fabric to make one continuous piece. I cut the underlapping edge 1 1/4 " long and the other edge only as long as the seam allowance. I want that side to end up even with the finished zipper edge.
You can see I offset the plaid pattern so when I sewed one end together,
it would give the appearance that the plaid was continuous.
Next I pinned, sewed, and trimmed the waistband. You see that I finished the
long edge at the top. There is a reason for that!
In order to finish the end pieces on the waistband, I turned the seams up toward the top of the waistband so they would end up on the inside when I turned the band.
I then clipped the corner for a pointed corner when I turned it.

Once you turn the waistband, have the finished long edge over lap the seam where you sewed the waistband to the skirt.
Then from the front pin the waistband from the front in the ditch. I bet you know what I am going to say next!
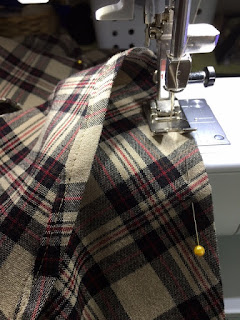
That's right! Stitch in the ditch from the front. This #10 Bernina foot is one of my favorite feet. This is also my favorite way to finish a waistband, less bulk.
So, I tried on my skirt and realized it turned out too big. I realized the reason for this was that I used a fabric with a slight stretch in the fabric. So, before I hand stitched the waist band edge that was not caught up in the ditch stitching, I added elastic to the back. When I put the skirt on, it lays flat. I simply threaded it into the waistband and stitched the ends across the waistband.
Now it fits perfectly!
This is one of my favorite tricks. I use a bodkin to guide the serger thread through itself so there are no hanging threads on the bottom of the hem.
I did a 5/8" narrow hem by first pressing up 5/8".
Then I turned the edge under and pressed just meeting the fold.
From the front, the top stitching ends up being a little larger than 1/4".
I did not us a rolled hem foot, because I do not like the twisted look that sometimes happens.
Love this beautiful finished edge!
And there you have it! A self drafted plaid circle skirt with one pocket and an invisible zipper.
Bring on the cold!


Comments
Post a Comment